BEARING LUBRICATION
Two options are recommended for electric vibrators.
Option1. GREASE REPLENISHMENT
Bearing come pre greased: they are not to be greased when new!
Apply proper electric vibrator grease every 1200 hours (1000 hours for speeds of 3600 rpm).
Make sure not to exceed the amount specified in the lubrication table
Do not mix grease types!. The refilling grease must be the same as the grease used previously.
Before pushing the grease through the fittings, make sure the fittings are clean, in order to avoid dust in the bearings.
Option 2. GREASE SUBSTITUTION
Replace with brand new grease every 5000 hours.
Take bearing apart, clean and reapply brand new grease.
Clean bearings thoroughly and reapply new grease not to exceed
the amount specified in the lubrication table.
| BEARING LUBRICATION TABLE |
FRAME SIZE |
0 |
1 |
2 |
3 |
4A |
4B
|
15A
|
15B
|
Vibrator
Model
NBR |
|
VE1/36/95
VE3/36/95 |
VE1/36/120
VE3/36/120
VE1/36/250
VE2/36/250
VE1/36/400
VE3/36/400
VE3/18/150 |
VE1/36/660
VE3/36/660
VE3/18/450 |
VE1/36/1050
VE3/36/1050
VE3/18/900
VE3/18/1200
VE3/12/600 |
VE3/36/1650
VE3/18/1500
VE3/12/800 |
VE3/36/2200
VE3/18/2200
VE3/12/1000
|
VE3/36/3000
VE3/18/4000
VE3/12/2000
VE3/09/1500
|
VE/36/4000
VE3/18/5000
VE3/12/2800
VE3/09/2000
|
IF YOU
ADD
GREASE |
|
none |
none |
none |
none |
none |
1200 |
1200 |
1200 |
Quantity per bearing
(ounces) |
(sealed) |
(sealed) |
(sealed) |
(sealed) |
(sealed) |
1/4 |
1/3 |
1/2 |
IF YOU
CHANGE
GREASE |
Working Hours |
none |
none |
none |
none |
none |
5000 |
5000 |
5000 |
Quantity per bearing
(ounces) |
(sealed) |
(sealed) |
(sealed) |
(sealed) |
(sealed) |
1/2 |
2/3 |
1 |
| |
FRAME SIZE |
20 |
30 |
50 |
70 |
70B |
120A |
120B |
120C |
| |
|
VE3/36/5000
VE3/18/6000
VE3/12/4000
VE3/09/3000
|
VE3/36/7000
VE3/18/8000
VE3/12/6000
VE3/09/5000
|
VE3/36/10000
VE3/18/10000
VE3/12/10000
VE3/09/8000 |
VE3/36/12000
VE3/18/15000
VE3/12/15000
VE3/09/12000 |
VE3/36/20000
VE3/18/17500
VE3/12/18000
VE3/09/14000
|
VE3/18/18000
VE3/12/18700
VE3/09/15000
VE3/09/18000 |
VE3/18/20000
VE3/12/20000
VE3/09/21000 |
VE3/18/25000
VE3/12/25000
VE3/09/24000
|
IF YOU
ADD
GREASE |
|
1200 |
1200 |
1200 |
1200 |
1000 |
1000 |
1000 |
1000 |
Quantity per bearing
(ounces) |
2/3 |
1 |
2 |
2 |
3 |
3 |
3 |
5 |
IF YOU
CHANGE
GREASE |
Working Hours |
5000 |
5000 |
5000 |
5000 |
5000 |
5000 |
5000 |
5000 |
Quantity per bearing
(ounces) |
1 |
1-1/2 |
3 |
4 |
5 |
5 |
6 |
9 |
Do not overgrease!
Overgreasing will force the bearing temperature to rise. When the temperature exceeds the maximum safety limit,
bearings will malfunction causing the vibrator to fail.
For optimal performance
use only Factory Certified grease "KLUEBER STAUBURANGS NBU 8 EP”.
For additional information and pricing please call directly
KLUEBER CORPORATION at 603-434-7704
If a different grease is used, vibrator can be damaged and warranty will be void.
Do not grease any other part of the motor.
Bearing Specifications
Vibrators have special long lasting bearings with a unique code specifying:
1. Bearing type
2. Cage size
3. Fit
4. (QP 51 in FAG bearings)
Example NJ-2310-E-TVP2-C4.
When replacing the bearings make sure the new bearings have the same exact and complete code. If it can not be found by the bearing house please contact the manufacturer.
Substituting originals with improper bearings (not matching the exact code) will cause the vibrator to fail prematurely.
Bearing fit for the VE Series (frame 4B and Higher) is C4
Running the vibrator with eccentric weight removed will damage bearings. |
 |
Bearing Replacement Procedure
This operation must be executed by qualified personnel only.
To proceed and replace the bearings operate as follows
1. Remove screws, lateral covers, retaining rings, weights and keys.
2. Extract bearing housing.
3. Using the two tapped holes in the bearing housing and two bolts, push out slowly bearing and seal.
Make sure you push evenly at both sides.
4. Extract rotor shaft from the body.
5. With a bearing extractor, pull out bearing's inner ring.
6. Check the bearing housing and the rotor shaft. Should they be damaged or worn, they must be replaced.
7. Remount the bearings. With the use of a press, push them completely into their housing.
8. Force new grease in between the roller cage and the outer ring.
9. For the rest of the vibrator assembly, follow the disassembly procedure in reverse.
During re-assembly, always use new screws, washers and seals,making sure that the seals are not damaged during installation.
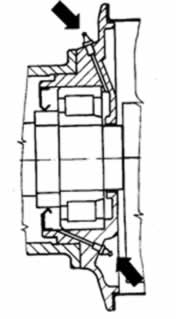
CAUTION! During bearing disassembly and reassembly, it is imperative for the flange to be kept perfectly in line with the vibrator body! Any misalignment could cause permanent damage to the bearings.
|
 |
back to MAIN PAGE
back to FORCE ADJUSMENT
next to NAME PLATE